
If you are getting an Error 21 code problem but can’t find any right guide or best solutions for how to fix and solve this error code problem, then today, check out this post once, and I hope you will surely get rid of this error problem from you entirely. So, see this below post once,
This shows an error code message like,
Error 21: Unable to access the network
The Connection to www.xyz.com was interrupted by a change in the network connection.
This is the most common error issue faced by users on the PC and on Smartphone devices. This error comes from the operator’s network. This error indicates that the monitor could not write to the specified address. This error can also include your PC or device crashes, virus infection, and sometimes freezes too. When you run any app, you may also get this error issue. This error may also occur when a BASIC program is running. It is also caused by a Windows security setting blocking any installation. This Error 21 happens if the attributes of the .pcf file for a particular connection are set to read-only.
Causes of Error 21 Issue:
- iPhone error issue
- Unknown error
- Hardware problem
So, here are the guides and the solutions for permanently fixing and solving this type of Error 21 Code problem.
How to Fix Error 21 Windows PC Issue
1. Update your Windows Drivers on your PC –

- Go to the start menu
- Search or go to the Control Panel
- Click on it and opens it there
- After that, scroll down and go to the “Windows Update” section there
- Click on it & Check if any newly latest driver update is available or not
- If any, Update it fast
- Or, you can set it as ‘automatically update.’
- For that, go to the left side
- & click on the “Changes Settings” option there
- After opening, click on the drop-down menu there
- Select the “Install Updates Automatically” option there
- & click on the OK button to save this configuration
- After completing, close the tab
- That’s it, done
So by trying this above method, you will get back from Error 21 fix windows.
” OR “
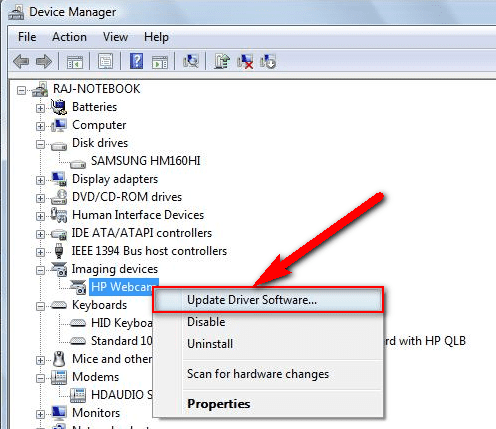
- Go to the start menu
- Search or go to the Control Panel or directly go to Device Manager
- Click on it and opens it there
- After going to the Device Manager there,
- check if any driver has an error sign there
- If any, then right-click on it
- & Click on the “Update driver software” there
- Wait for some minutes to update it
- After updating, close the tab
- That’s it, done
Updating your driver using these two methods can quickly fix and solve this Error 21 Airtel problem from your PC.
2. Reset TCP/IP (Transmission Control Protocol/Internet Protocol) on your PC –

- Go to the start menu
- Search or type Command Prompt there
- Opens it & type
netsh int tcp reset resettcpip.txt - Press Enter there
- That’s it, done
Resetting TCP/IP on your computer or laptop will surely solve this connection failure with the Error 21 problem.
3. Clear your Internet Browsing Cookies and Caches on your PC –
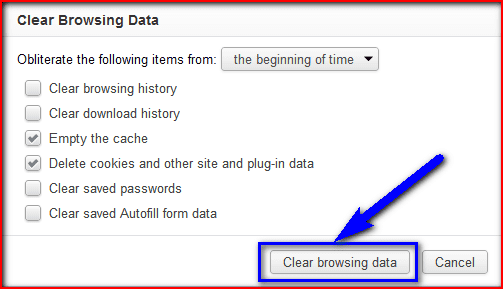
- Go to your Browser
- Click on the Settings tab or click on the History option
- Go to the “Clear Browsing Data” option there
- Tick the ‘Cookies‘ and ‘Caches‘ options there
- If you want any more to delete, then tick that option too
- Now click on their drop-down menu
- Select the ‘from the beginning‘ option there
- Now, click on the “Clear Browsing Data” button there
- Wait for some minutes to delete it
- Now, close the tab
- That’s it, done
Clearing your browser’s browsing data can eliminate this error 21 hardware solution problem from you.
4. By assigning DNS Address manually on your Windows PC –
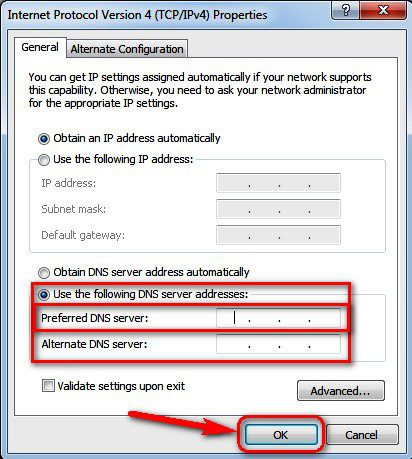
- Go to the start menu & click on the Control panel or
- Directly go to the “Open Network and Sharing Center” & click on it
- Now, go to the Properties tab there
- Now, a pop-up will open there &
- Click on the “Internet Protocol Version 4 (TCP/IPv4)“
- & click on their properties tab there
- Now, tick the “Use the following DNS server addresses” tab there
- & change the ‘Preferred & Alternate DNS Server‘ by the following,
Preferred DNS Server – 8.8.8.8
Alternative DNS Server – 8.8.4.4 - & tick the “Validate settings upon exit” & tick on OK button there to save
- Wait for some seconds to save
- After completing, close the tab
- That’s it, done
Assigning the DNS addresses manually can also fix & solve this Error 21 globe problem.
5. Flush the DNS on your Windows PC –
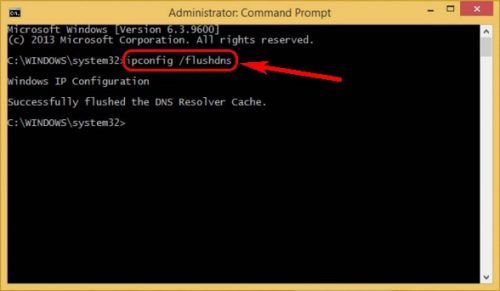
- Go to the start menu
- Search & go to the CMD (Command Prompt)
- Click on it and opens it
- A Pop-up will open there
- Type this below command there
” ipconfig /flushdns “ - Press Enter there to start it
- After that, wait for some minutes
- After completing, close the tab
- That’s it, done
Running this command in the command prompt (cmd) can also fix this Error 21 one plus problem.
6. Change the Internet LAN (Local Area Network) Settings –

Check your proxy settings or contact your network administrator to ensure the proxy server is working to eliminate this Error 21. If you don’t believe you should use a proxy server, then,
- Go to the Google Chrome menu
- Click on the Settings tab there
- Click on the ‘Show Advanced Settings‘ option there
- Click on the “Change Proxy Settings” tab there
- Now, go to the “LAN settings” and deselect the
” Use a Proxy server for your LAN “ - After deselecting, close the tab there
- That’s it, done
By checking your proxy settings, you can quickly eliminate this can’t send the message with Airtel Error 21 problem from your browser.
7. Reinstall the Network Adapter on your Windows PC –

- Go to the start menu
- Search or go to the ‘RUN.’
- Click on it and opens it.
- After that, Type this below the following command there
” hdwwiz.cpl “ - Press Ok there
- Expand network adapters, locate your network adapter name
- Note down the name,
- Right-click on that adapter
- Choose and click on the Uninstall option there
- Reboot or restart your PC once
- After resuming, reconnect to your network & test
- If it isn’t installed, then download it from the manufacturer’s website
- After that, run it and reinstall it
- After that, test it
- After completing, close the tab
- That’s it, done
You can get rid of this error 21 problems by reinstalling the network adapter.
Conclusion:
These are some quick methods and solution guides for getting rid of this Error 21 Code problem entirely from you. Hopefully, these solutions will help you get back from this Error 21 problem.
If you are facing this Error 21 Code problem or any error problem while fixing it, then comment down the problem below so that we can also fix it with our top best solution methods from which you can easily get rid of.


