
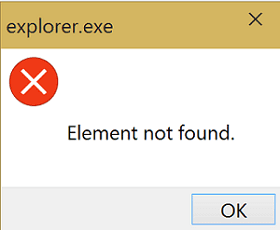
Element not found Windows is an error that is related to your windows explorer. This error occurs when you try to open windows default picture viewer when using Microsoft edge, opening apps, or navigating through the system. Due to this error, a user is unable to access applications, drives, folder, and pictures viewer, etc. The reason for this error can be a system upgrade, corrupted system files, etc. For some users, a normal restarting of the system fixes the problem. However, if a restart doesn’t solve your problem, we advise you to follow our methods that will fix the Windows 10 Explorer.exe Element Not Found error in a few minutes. But before, let’s go through its causes.
This shows an error code problem issue,
Causes of Element Not Found Windows Error Issue:
Windows 10 Explorer.exe Element Not Found error is caused due to instability in the explorer.exe. Explorer helps us to manage our files, folder, and let us perform operations like cut, copy, paste, delete, etc. Majorly this Windows 10 Explorer.exe Element Not Found error causes due to an OS upgrade, system files corruption, boot file corruption, etc. Let’s take a look at all the major reasons.
- Operating System Upgrade
- System Files Corrupted
- Boot Files are corrupted
- Corrupted System Application
- Issues with the running services
Similar Types of Element Not Found Windows Error Issue:
- Word document
- Microsoft office hub localbridge.exe
- Element not found Microsoft word
- Excel element not found
- Microsoft office
- Element not found windows 10 excel
- When opening a word document
- Element not found the office
How to Fix & Solve Element Not Found Windows Error Issue
This Windows 10 Explorer.exe Element Not Found error is related to the system and may cause instability; fortunately, there are some troubleshooting methods that you could try to fix the Windows 10 Explorer.exe Element Not Found error. Kindly follow each of the instructions carefully to avoid further issues. Let’s Proceed.
1. Restart Explorer.exe Process Using Task Manager –
The first Windows 8 Explorer.exe Element Not Found error method, which you must try, is to restart your explorer.exe using the task manager. Follow the steps to see how it is done.
- STEP 1. Go to Task Manager, Press ALT + CTRL + DELETE, Choose Task Manager
- STEP 2. Under the Process Tab locate explorer.exe
- STEP 3. Select explorer.exe and Click on End Task
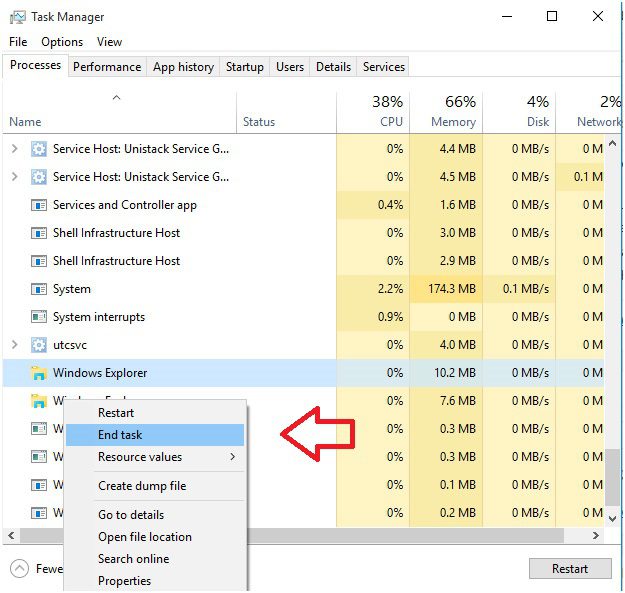
- STEP 4. Now in order to restart, go to File > New Task, a run box will appear
- STEP 5. In the run box, simply Enter explorer.exe and hit Enter
2. Uninstalling Lenovo Applications –
If you are using Lenovo system, kindly uninstall Lenovo applications majorly OneKey Theater, Lenovo CAPSOD. These applications are the reason for the Windows 7 Explorer.exe Element Not Found error.
- STEP 1. Click on Start, type Run, and Hit Enter
- STEP 2. Type appwiz.cpl in the Run box, and hit Enter

- STEP 3. Now locate OneKey Theater and Right Click > Uninstall
- STEP 4. After that uninstall Lenovo CAPSOD
- STEP 5. Finally, Restart Your System and check whether the error still exists
3. Uninstalling the Updates –
If you have recently done any major updates like windows 7 to 10, we suggest you do a clean Windows reinstall. However, if you did minor system updates, you can try uninstalling the update to fix the Windows 10 Explorer.exe Element Not Found error.
- STEP 1. Click on Start and Go to Settings
- STEP 2. Now click on to Update & Security

- STEP 3. Click on Windows Update on left side
- STEP 4. Click on Update History
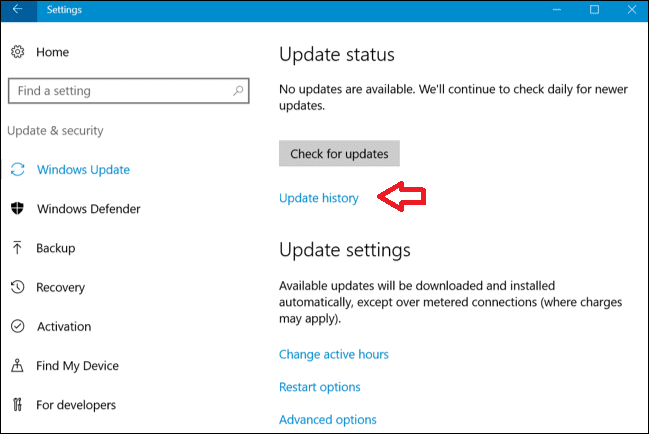
- STEP 5. Finally Select Uninstall updates
- STEP 6. Restart Your System
4. Changing the Default Picture Viewer –
Explorer.exe Element Not Found Windows 10 error is found when using the default windows picture viewer, you can get rid of this error by changing the default picture viewer.
- STEP 1. Click on Start and Go to Settings
- STEP 2. Go to apps, On the left Click on Default Apps
- STEP 3. On right kindly click on Photo Viewer
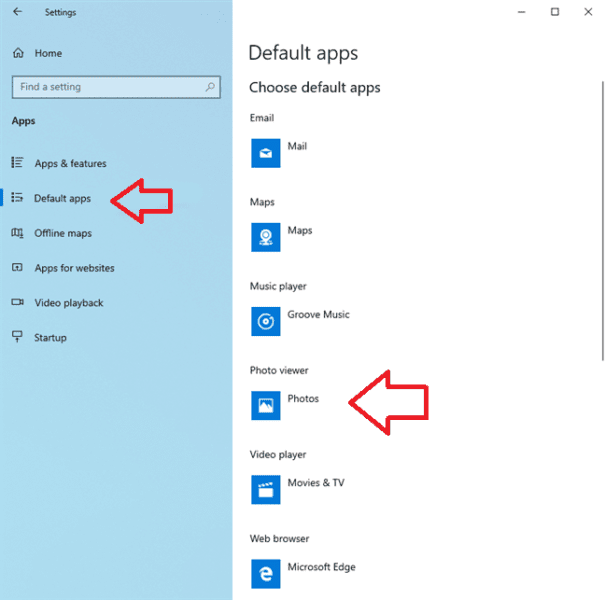
- STEP 4. Choose an application that you want to use as a default Photo viewer
- STEP 5. After Changing, Restart the system and check the error if it still persists
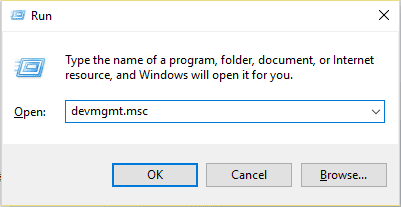
5. Updating the Drivers –
Explorer.exe Element Not Found Windows 8 error also causes due to outdated system drivers, so make sure to keep them updated.
- STEP 1. Click on Start, type run and hit Enter
- STEP 2. Type devmgmt.msc and hit Enter
- STEP 3. Now Check all major drivers like sound, display, disk, and USB drivers
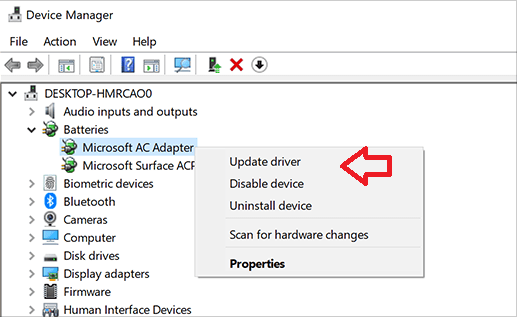
- STEP 4. Click on Search automatically for updated driver software
- STEP 5. Your system will automatically download and install the latest driver
- STEP 6. Reboot your system and check if the error still exists
6. Perform SFC & DISM Scan –
In this Explorer.exe Element Not Found Windows 7 method, we will make sure that our hard drive and image files are not corrupted. By chance, if they are corrupted, they will get restored to its full health. Follow the steps to see how it is done.
- STEP 1. Click on Start, type Run, and Hit Enter
- STEP 2. Type cmd, to enter into the command line
- STEP 3. Type the command sfc /scannow
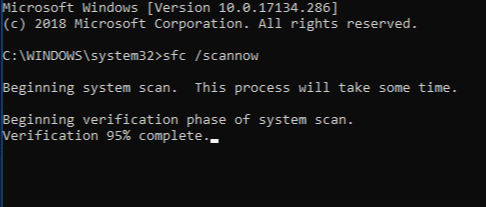
- STEP 4. Wait until the process finishes, now perform DSIM scan
- STEP 5. Finally, type Dism /Online /Cleanup-Image /RestoreHealth and Hit Enter
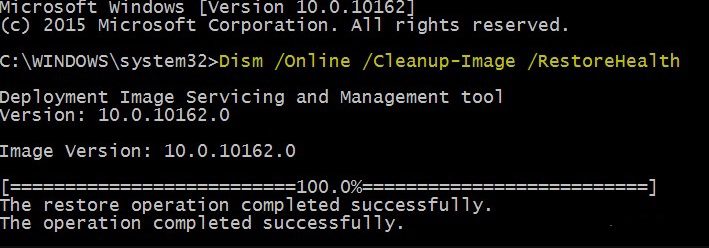
- STEP 6. Wait till the process finished and Reboot System
7. Resetting your Windows –
Kindly use this Windows 10 Explorer.exe Element Not Found error method after trying out all of the above methods.
- STEP 1. Click on start > power button > Hold Shift and click Restart
- STEP 2. Choose Troubleshoot > Reset this PC
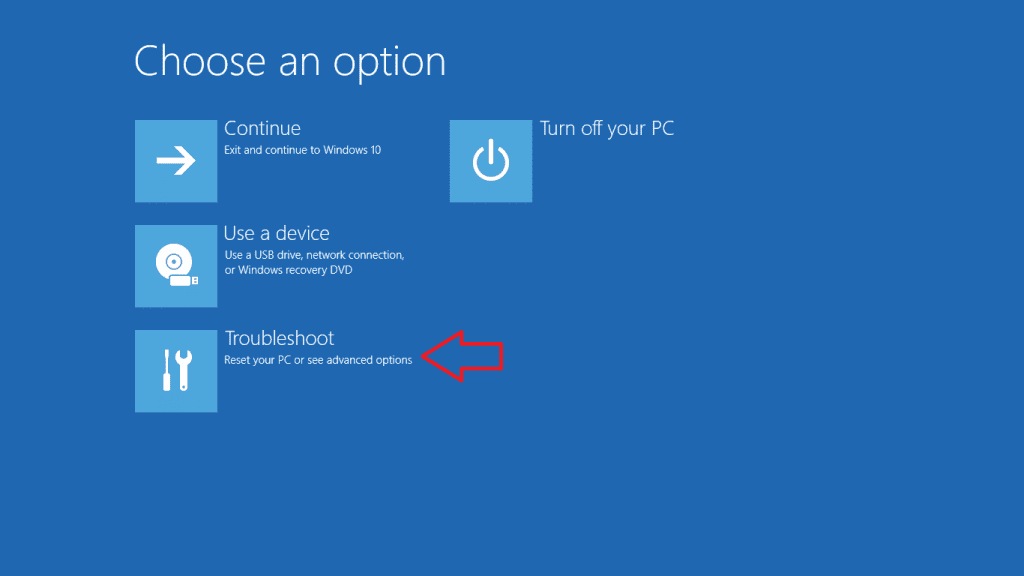
- STEP 3. Choose whether you want to keep your files or remove everything
- STEP 4. Then select Just remove my files

- STEP 5. Click Reset
- STEP 6. Follow the instructions on the screen to complete the process
Conclusion:
Windows 10 Explorer.exe Element Not Found Error can be a little complex error to solve, but using the above-given methods, you will surely fix this. With this being the end of the article, we have given you all the information, the cause of the error, and how does it affect the system. We have stated all the Windows 10 Explorer.exe Element Not Found error method using step by step guide for a better understanding.
If this Windows 10 Explorer.exe Element Not Found error article is helpful to you, follow us for more articles like this. Thank You!


 “AI App of Unimaginable Terror: Best AI App for iPhone”")
