
Windows is a fantastic operating system; it is one of the leading operating systems of the world and known for its satisfying user experience. But sometimes we are faced with some errors that really messes with our mind and take a lot to fix it. Here we are talking about similar network access is denied error.
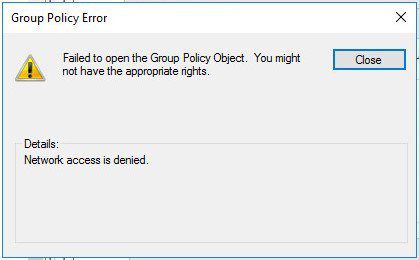
“XYZ not accessible. You might not have permission to use this network resource. Contact the administrator of this server to find out if you have access permission. This account is not authorized to log in from this station.”
Suppose you and your friend are sharing some essential data, you connected your systems with high-speed LAN and got ready to share right when you click to open the folder out of nowhere you are faced with a dialogue box with a red cross on it with a statement.
And now, all you are left with this dialogue box and your pending work.
But don’t worry, we have a solution to this Network Access is Denied windows problem kindly follow each step to have a pain free sharing.
Causes of Network Access is Denied Windows Error:
This Network Access is Denied error can be caused due to various problems.
- Windows firewall as it doesn’t allow guest systems to share data by default.
- Network Access is Denied error also arises due to upgrading windows.
- Pending Updates of network drivers, always keep your drivers updated.
- Malware can be the cause of these problems.
- Use of Virtual Private Network can also lead to this error.
- Make sure you are logged in with the Administrator account.
How to Fix & Solve Network Access is Denied Windows Error Issue
1. Using Registry Editor (Regedit) –
- STEP 1. Click on Start, type ‘run’ and search ‘regedit’ and hit Enter.
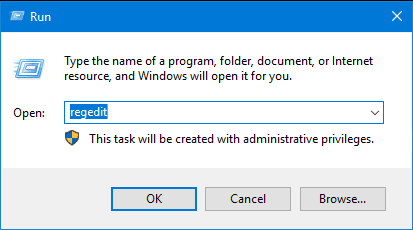
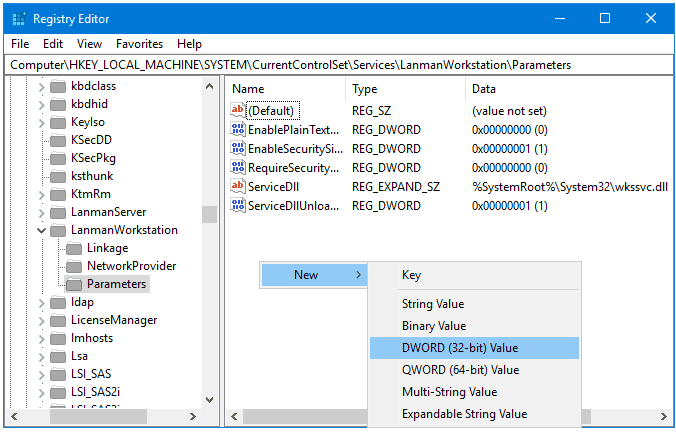
- STEP 2. Now in Registry editor, navigate using the path below
HKEY_LOCAL_MACHINE > SYSTEM > CurrentControlSet > Services > LanmanWorkstation > Parameters
- STEP 3. On right hand side, right-click > NEW > select DWORD (32-bit) value
- STEP 4. Save it with the name ‘AllowInsecureGuestAuth.’
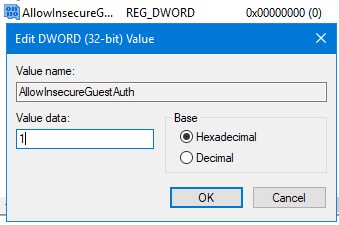
- STEP 5. Right-click on ‘AllowInsecureGuestAuth’ > modify >put 1 in Value data > click OK
- STEP 6. Reboot your system.
That’s it, and it will fix this Network Access is Denied error from your system.
2. Using Control Panel (Works on Windows 7) –
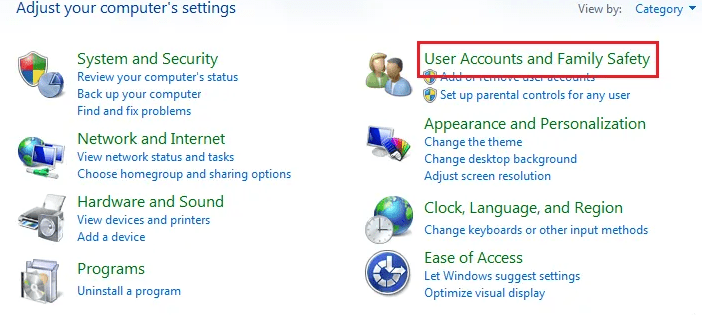
- STEP 1. Open Control Panel and go to User Account and Family Safety.
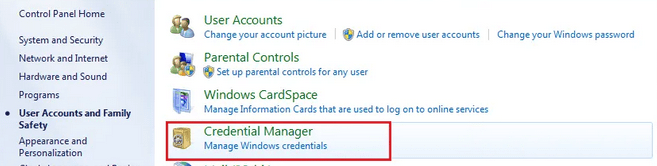
- STEP 2. Select Credential Manager
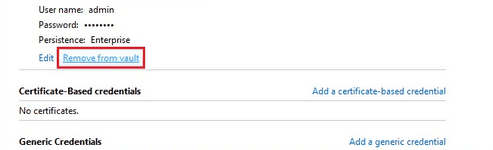
- STEP 3. Select your Connected Computer from which you want to access files.
*NOTE: However, in some cases, the system doesn’t show up than kindly jump to STEP 5.
- STEP 4. Below you will see Remove from Vault click on it and select yes
- STEP 5. Now from above select Add a Windows Credential
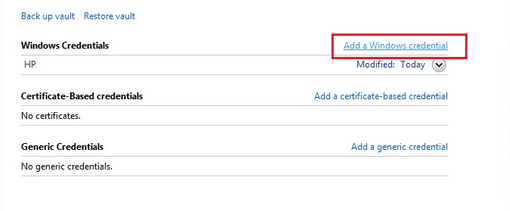
- STEP 6. In the Internet or network address bar put your connected computer name or IP address
- STEP 7. In the User name bar, put the user name of the connected computer.
- STEP 8. In Password, bar, put the password of the connected computer.
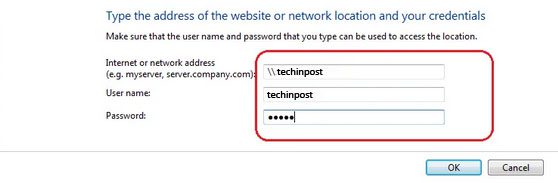
- STEP 9. Click OK
And Voila, everything is fixed. You have removed network access is denied error.
Conclusion:
With the above steps, you will surely fix Network Access is Denied error and now you can share and transfer files without any complications these security measures are implemented by Microsoft just to make sure that your data and information remain secure. Nobody can access your information without permission.
I hope this Network Access is Denied windows tutorial helped you, and finally, you got rid of painful access denied error, it would be great if you share your experience in comments and if you have any other solution to this Network Access is Denied error problem, we will be more than happy to know it. Kindly share if you face any difficulty while going through the tutorial, and if you have any other windows error related problems, mention it. We will surely consider it and come up with a solution. Follow us for exciting tips and tricks on troubleshooting Windows errors.


 “AI App of Unimaginable Terror: Best AI App for iPhone”")

