
Windows has gone to great heights in the operating system world. But with the advancement, something that was absent in the older versions has emerged somehow. The boot error Selected Boot Image did not Authenticate Press Enter to Continue Windows PC. This error has been associated mostly with the upgrades and driver updates. Moreover, this message seems to be very much related to the HP computers only as per the complaints received.
This shows an error code message like,

What does Selected Boot Image did not Authenticate Mean?
This error will show up on a blue strip within the black background as soon as you restart or press the power button of your PC to boot. If you press enter, it will only shut down the PC, and then eventually it will return to the same screen. This Selected Boot Image did not Authenticate error occurs because a security protocol has been violated while being checked against the firmware database, or maybe the device from which the operating system is being loaded, cannot provide the required information by security for booting.
Causes of Selected Boot Image did not Authenticate Windows Error:
- Windows PC Error
This Selected Boot Image did not Authenticate Press Enter to Continue issue can also occur if the boot loader information is missing, and thus, the OS cannot be loaded. This boot information is used to identify the OS on your drive. Therefore if the boot information isn’t loading, then the authentication process will not occur.
How to Fix & Solve Selected Boot Image did not Authenticate Windows Error Issue
So let us look into the solutions that will fix the Selected Boot Image did not Authenticate Press Enter to Continue Windows PC error and will allow you to complete the booting process.
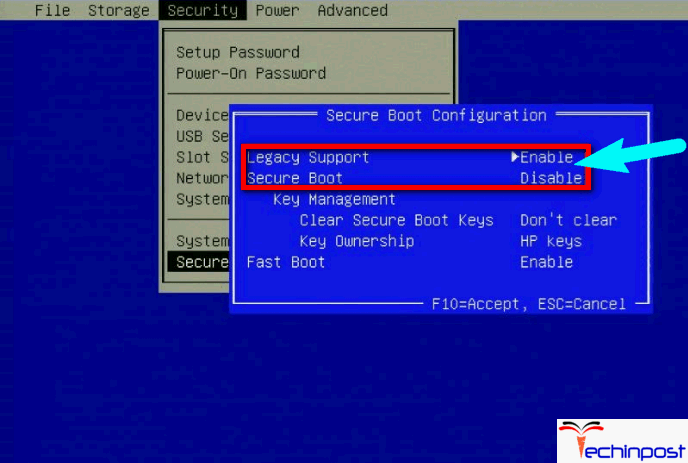
1. Changing from the Secure Boot to the Legacy Boot in BIOS Settings –
Changing the secure boot to the legacy boot will ignore the changes in the operating system and the hardware and then continue the booting. If you can be sure that your PC cannot finish the boot process due to malware or virus attack, then this step is not advisable to you. Use the 3rd method instead. The Selected Boot Image did not Authenticate Kali Linux methods steps to disable the secure boot and then enable the legacy support on your HP computer are.
- Turn off the PC entirely and wait for a few seconds. Now turn on your PC by pressing the Power Button and then immediately pressing the Esc button repeatedly at about once in every second. Do this until the Startup menu appears.
- When the Startup Menu appears, press on F10 to open the BIOS Setup.
- Use the arrow keys to choose the System Configuration menu and then select Boot Options and press Enter.
- Use the arrow keys to select the Legacy Support and then press Enter. Now select enabled if disabled is selected and then press Enter.
- Use the arrow keys to select the Secure Boot and then press Enter. Now select Disabled and then press Enter.
- Now press F10 to accept the changes that you have made and to use the arrow keys select Yes and then press Enter in order to Exit Saving Changes.
- The PC will automatically reboot to Windows with the Secure Boot disabled, and the legacy support enabled.
2. Hard Resetting of your Computer –
This Selected Boot Image did not Authenticate Linux method will reset all the configurations that are on your BIOS apart from the passwords, and then allow the hardware changes and the new configurations OS changes on the next reboot. In this way, all the conflicting configurations will get cleared. Here are the steps to hard reset an HP PC.
- Turn off your PC first completely.
- Then unplug the AC adapter cable and remove the battery and insert it back after some time.
- Now press and hold the power button of your PC for at least 30 seconds. This is going to reset the hardware of your PC.
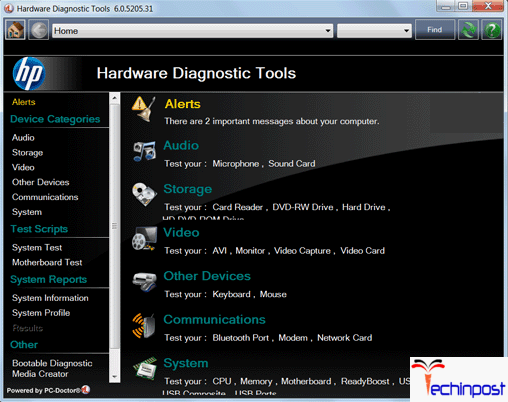
- Now, as you reboot your PC tap on the F2 key. Now the hardware diagnostics will load.
- You should run the start-up test as this will test every hardware components in your system and will detect any kind of Selected Boot Image did not Authenticate tails problems that are present.
- If the test result shows no problem, then restart your PC and reboot normally.
3. Repairing Windows of your PC using the System Recovery –
A system repair can fix the USB Selected Boot Image did not Authenticate Clonezilla Windows 10 error & the boot information along with other Windows-related problems. Here are the steps to do the windows system repair for the HP users.
- Turn off the PC entirely and wait for a few seconds. Now turn on your PC by pressing the Power Button and then immediately pressing the Esc button repeatedly at about once in every second. Do this until the Startup menu appears.
- Now when the Startup Menu appears, press F11 to takes you to the recovery console.
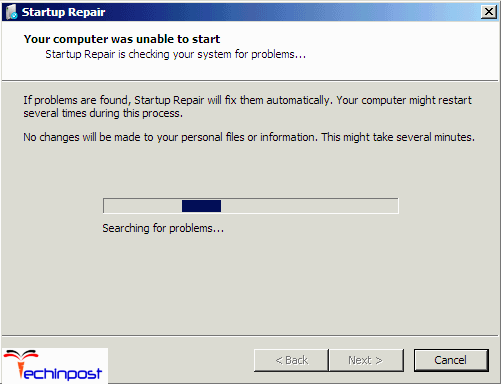
- Choose Troubleshoot and then Advance Options and then click on the Startup Repair.
- Now accept the repair processes and wait till the repair is complete and then restart your PC.
So here, these are the solutions and tips for getting rid out of this type of error Selected Boot Image did not Authenticate Press Enter to Continue Windows PC Issue. I hope these Selected Boot Image did not Authenticate sccm methods will help you and work on your Windows PC.
& If you are getting or facing any error issue while trying to fix Selected Boot Image did not Authenticate Press Enter to Continue Windows PC, then comment that problem here below in the comment section or email us as well as.


 “AI App of Unimaginable Terror: Best AI App for iPhone”")


I have an HP Envy x360 15-bp152wm, and enabling legacy didn’t fix the problem, disabling legacy mode and disabling secure boot, along with an additional step of selecting the option “clear all secure boot keys” and entering a verification code to clear the keys, fixed the problem, and allowed me to boot tails from my usb that I’d been using on other machines successfully.
If my keyboard doesn’t work, how can I do it then?