
The Windows Computer serves the best computing experience. I can’t imagine any other OS delivering such excellent service from the last 20 years of my computing usage. However, there are sometimes i run into some grotesque error messages. One such error message is The Device is Not ready Windows. While trying to save or back up data on one of my drives, I was hindered by this error message.
Furthermore, i wasn’t able to access a media file as well because of this. The Device Is Not Ready Windows error. Hence, I searched and Figured out some effective methods which work like magic on this error message.
What is The Device Is Not Ready Windows Error Problem?
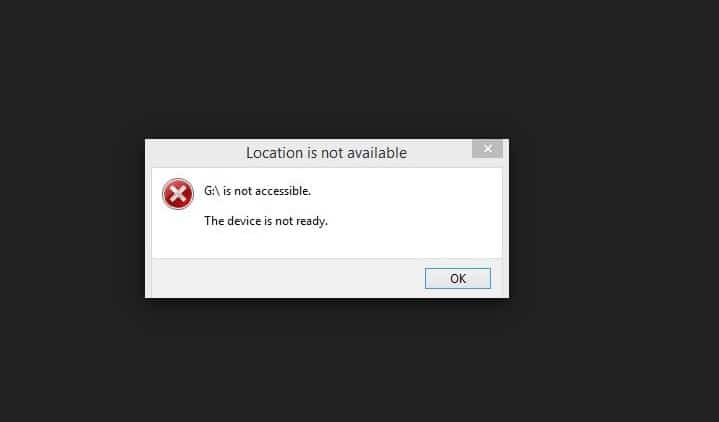
A user may get this error message while trying to copy a file to one particular drive. Moreover, Windows users trying to Open an External Hard Drive, USB Flash Drive, also may fall victim to this error. This error message is otherwise known as ERROR_NOT_READY error with Error code 0x80070015.
Causes of The Device Is Not Ready Windows Error Issue:
Although many possibilities could incite this Error Message, Microsoft Revealed three significant reasons behind it. Here I’m listing all of them.
- The Drive is Empty
- The Drive is Already in use
- Your drive is Damaged
- Corrupted Hardware
- Incompatible third-party or inbuilt Apps and Drivers
Types of The Device Is Not Ready Windows Error Problem:
This error message could have different extensions and different error codes depending on which device is it related to. It could be a distinct Software, Hard Drive, Flash Drive, Network Drive, or so on. Here are the possible types of messages.
- The device is not ready to flash drive
- Is not accessible the device is not ready windows
- Diskpart has encountered an error the device is not ready windows
- Crucial SSD the device is not ready windows
How to Fix & Solve The Device Is Not Ready Windows Error Problem
The error message could be a serious concern when you’re running late for a meeting or a job where you seriously need to access the data on the drive. I’ve figured out some practical solutions which are practical, easy to use, and efficient at abolishing this The Device Is Not Ready Windows error.
1. Reinstall your Device Driver –
One possible reason behind this The Device Is Not Ready Windows 7 error message is the driver for your peripheral device or the hard disk is corrupted, outdated, or somehow not working as it should be. The best solution here is to reinstall the driver. Here’s how you could do it.
- Press Windows Key and Letter R together from keyboard
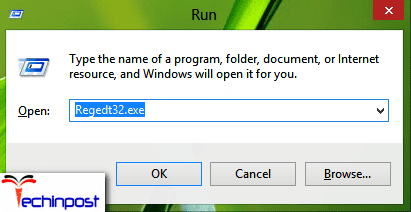
- A Run box shall open
- Type devmgmt.msc and press enter
- Windows will open a list of drivers
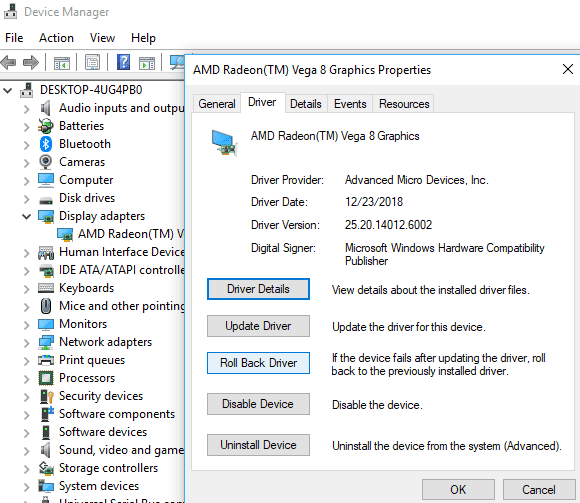
- Choose the faulty driver
- Uninstall Driver
- Go to your computer’s Manufacturer’s website
- Download the Driver you uninstalled
- Install the Driver
- Done!
2. Check the Connections –
This might sound silly, but most of the time, the hardware connection is the problem we overlook easily. Hardware connections can get loose or unplug over prolonged use. To counter this, first, you need to check the connections. Follow these diskpart has encountered an error The Device Is Not Ready steps.

- Unscrew all the hardware
- Check the USB connections
- If there’s an unplugged socket, Plug it back in
- Screw back your Hardware after making sure everything looks good
- Disconnect all the peripheral accessories
- Restart your computer
- Plug them back in
3. Assign a Letter to your External Drive –
Another approach to do away with this Virtual disk manager The Device Is Not Ready error message is to assign a letter to the External Drive. You can do so by using Disk management. Please follow these steps.
- Press Windows key and Letter R together on your keyboard
- Type diskmgmt.msc and press Enter
- This will bring up the drive console
- Right-click on the External Drive which opens drive menu
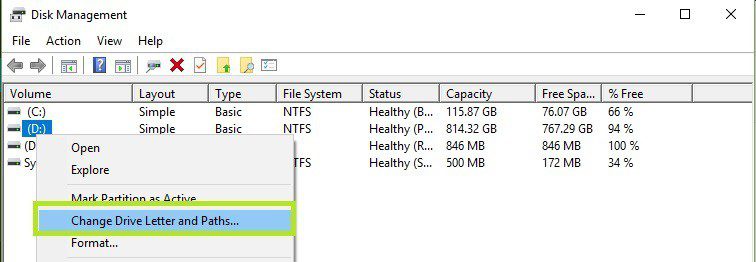
- Click over Change Drive Letter and Paths
- Click Change
- Tap on Assign the Following Drive Letter

- next Choose Drop-Down menu to see the available names
- Select the Letter of your choice and click ok
- A Warning message will pop, click ok
4. Close the App –
As Microsoft suggests, this Virtual disk manager The Device Is Not Ready error could occur because of an already opened app. What you can do is Close the app which is already opened. Try to perform your desired action again and see if it works. If this step doesn’t work, you can try the next method on this list.
5. Run the Hardware Troubleshooter –
When all of The Device Is Not Ready CMD ways above prove ineffective, you can always use the inbuilt troubleshooter to pacify your hardware. Windows comes with an inbuilt free of cost Hardware troubleshooter, which fixes almost every incompatibility issue.

- Go to the Search box of your desktop screen
- Type Settings and press enter
- Go to Updates and Security
- Visit troubleshooter
- Select the relevant option and follow the instructions to perform the troubleshooting
- Done!
Conclusion:
In conclusion, I’d say that the error The Device Is Not Ready Windows could be stubborn and not go out quickly. However, following these, The Device Is Not Ready Windows methods, step by step will be helpful to you.
Comment below if you face any challenges in performing these The Device Is Not Ready Windows solutions. Have a great day!


 “AI App of Unimaginable Terror: Best AI App for iPhone”")


")